
Open shelving has transcended the trend cycle to become a cornerstone of modern interior design. Whether you are aiming for a minimalist Scandi-kitchen, a cozy rustic bedroom, or a functional bathroom upgrade, the secret to a professional-looking shelf lies not just in the wood itself, but in the brackets that hold it. While big-box retailers offer a plethora of pre-made options, there is an undeniable satisfaction—and aesthetic advantage—to crafting your own. By building your own custom wooden shelf brackets, you gain total control over the scale, style, and structural integrity of your shelving project.
This guide explores three distinct, accessible methods for crafting custom wooden shelf brackets, providing a roadmap for DIY enthusiasts of all skill levels to elevate their living spaces.

The Philosophy of Custom Bracketry: Why DIY?
Building a shelf is often the "gateway project" for budding woodworkers. It is inherently cost-effective, requires minimal space, and offers immediate gratification. However, the true value of crafting your own brackets lies in customization.
Standard store-bought brackets often come in rigid sizes that may not fit your specific wall space or your desired shelf depth. When you build your own, you can determine the exact "heft" of the bracket. Want a thick, architectural look? Simply laminate two pieces of wood together for a substantial, custom profile. By utilizing scrap lumber from previous projects, you are not only saving money but also engaging in sustainable home improvement.

A Note on Structural Integrity
Before we dive into the construction, a critical caveat for any home improvement project: Safety is paramount. These brackets are designed to support decorative items and lighter household goods. If your intention is to store heavy hardback books, stoneware dishes, or small appliances, it is non-negotiable that your brackets must be anchored directly into wall studs. Never rely solely on drywall anchors for heavy loads.
The Three Pillars of Bracket Construction
We have identified three primary styles of DIY shelf brackets that cater to different aesthetic preferences and skill sets. Each requires only basic tools—typically a miter saw, a drill, and a jigsaw or scroll saw for more intricate designs.

1. The Simple Chunky Bracket (The Farmhouse Standard)
The "Chunky" bracket is a testament to the idea that simplicity is the ultimate sophistication. Popularized by rustic farmhouse design, this style relies on the raw, bold aesthetic of 4×4 lumber.
The Methodology:

- Material Selection: Use a scrap piece of 4×4 pine or cedar.
- The Cut: Using a miter saw, cut your lumber at a 45-degree angle to create that classic wedge or "corbel" look.
- Installation: The strength of this bracket comes from its mass. To install, pre-drill two pilot holes through the angled edge of the bracket. This allows you to drive 3-inch wood screws directly into the wall studs, ensuring a secure grip that won’t pull away under the weight of the shelf.
2. The Basic Curved Bracket (The Soft Silhouette)
If your home decor leans toward cottage-core or transitional styles, a curved bracket adds a touch of elegance to otherwise rigid lines. This is an excellent project to practice your jigsaw skills.
The Methodology:

- Template Preparation: Start by drawing a curve on a piece of cardboard to create a template. This ensures that every bracket you cut is identical.
- Precision Cutting: Transfer your template to a 2×8 board. Use a jigsaw or a scroll saw to follow your lines slowly. The key to a clean curve is a steady hand and a fine-toothed blade.
- Hardware: Because these are often more decorative, they pair beautifully with keyhole hangers. These allow for a flush-mount finish against the wall, hiding the hardware from view and providing a professional, custom-built appearance.
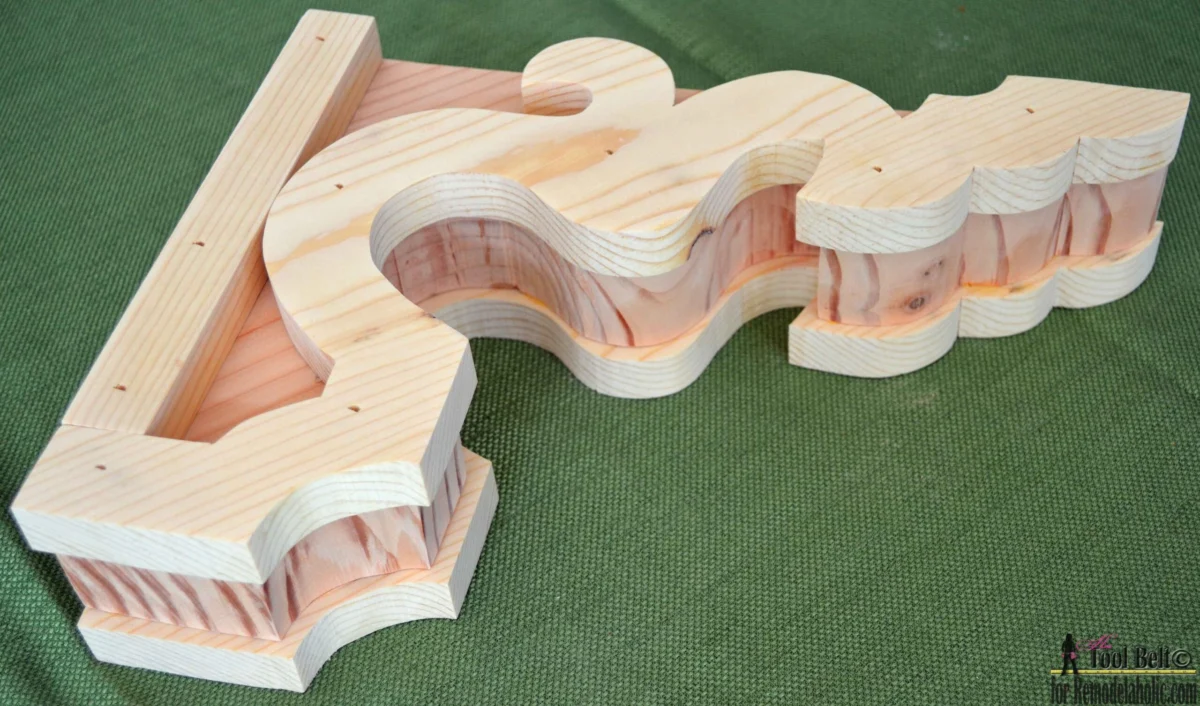
3. The Vintage Layered Bracket (The Architectural Statement)
For those who want to push their woodworking skills further, the layered bracket offers a high-end look that mimics vintage Victorian or craftsman-style corbels.
The Methodology:

- Layering Technique: This style involves cutting multiple pieces of wood (typically 1×8 and 2×10) and laminating them together using high-strength wood glue.
- Visual Interest: By offsetting the layers, you create depth and shadows that draw the eye.
- Finishing: Once glued and clamped, sand the edges until the pieces look like a single, unified unit. This style is particularly effective for larger mantels or deep shelving units where a single, thin piece of wood would look disproportionate.
Supporting Data: Understanding Weight and Mechanics
Many homeowners express concern regarding the load-bearing capacity of DIY solutions. When assessing the strength of your project, you must view the shelf and bracket as a system.
- The 2/3 Rule: For maximum stability, your bracket depth should be at least two-thirds the total depth of the shelf. If you have a 12-inch deep shelf, your bracket should extend at least 8 inches out from the wall.
- The Stud Advantage: A bracket is only as strong as its anchor. A 3-inch screw driven into a structural wood stud can hold significantly more weight than a screw held in place by a toggle bolt in drywall. For a standard 30-inch shelf supported by two brackets, you can comfortably hold 20+ pounds, provided the hardware is centered on studs.
- The Overhang Variable: It is perfectly acceptable for a shelf to slightly overhang the brackets—usually by 1 to 2 inches. Beyond that, the lack of support at the edges can cause the wood to warp or tip if weight is placed on the ends.
Implications for Your Interior Design
The impact of custom brackets extends beyond the shelf itself. They serve as "jewelry" for your walls. A well-placed bracket can:

- Frame a Doorway: Using large corbels as decorative casings around a doorway can instantly age a home and add character to a generic builder-grade floor plan.
- Define a Mantel: By adding substantial, chunky brackets beneath a floating mantel, you create a focal point in the living room that grounds the fireplace.
- Create "Invisible" Shelving: For a more modern approach, consider mounting your brackets such that they are partially recessed, or using the "disappearing" bracket method where the support is hidden within the thickness of the shelf board itself.
Expert Tips for a Professional Finish
Regardless of the style you choose, the final look is dictated by your attention to detail.
- Leveling: Even the most beautiful bracket will look poor if it is crooked. Invest in a laser level. It is a small investment that prevents the "stair-step" effect often seen in amateur DIY shelving.
- Wood Choice: If you plan to stain your brackets, use a high-quality hardwood like oak or poplar. If you plan to paint them, pine is perfectly adequate and significantly cheaper.
- The Glue-Up: Never rely solely on nails or screws. Wood glue is the secret weapon of the professional carpenter. When used correctly, it creates a bond that is stronger than the wood fibers themselves.
- Pre-Finishing: It is significantly easier to paint or stain your brackets before you hang them on the wall. This prevents accidental splatters on your drywall and allows you to get into the nooks and crannies of curved or layered designs.
Conclusion: The Path Forward
Building your own wall shelf brackets is an exercise in both creativity and utility. By opting out of mass-produced plastic or flimsy metal options, you are choosing to invest in the longevity and character of your home. Whether you opt for the bold, modern profile of a 4×4 chunky bracket, the soft elegance of a curved design, or the sophisticated depth of a layered corbel, the result will be a space that feels uniquely yours.

As you embark on your next weekend project, remember that the best DIY projects are those that balance aesthetics with structural common sense. Measure twice, cut once, and ensure those screws find their way into the studs. With the right preparation, your walls will not only hold your belongings but will showcase your craftsmanship for years to come.